Godot editor scripting using C#
Godot editor scripting using C#
I’ve recently started experimenting with Godot in C#, and decide to start by poring my UnityVolumeRendering plugin over to Godot. This plugin does a lot of custom editor scripting, such as custom editor windows, scripted importers, file dialogs, and more.
In this blog post I will cover what I’ve learnt so far from porting this from Unity to Godot, and cover some of the similarities and differences between editor scripting in the two engines.
I will be using examples from my new GodotVolumeRendering project, ported from my original Unity plugin.
Table of contents:
- Making a plugin
- Exclude code from compilation when not in editor (Unity:
#if UNITY_EDITOR) - Making a custom Node (Unity: GameObject/Component)
- Getting _Ready() and _Process() to run in editor (Unity:
ExecuteInEditMode) - Creating a custom inspector plugin (Unity: Custom
Editor) - Creating a file dialog (Unity:
EditorUtility.OpenFilePanel) - Designing your editor UI
Making a plugin
First we need to set up our plugin.
For this, I would recommend to first read the official documentation, which now also covers how to do this in C#. It covers everything step-by-step.
You can find my own plugin that this blog post is based on here.
In general, you will need a plugin.cfg that describes your plugin:
[plugin]

name="GodotVolumeRendering"
description="Volume rendering of 3D volumetric datasets"
author="Matias Lavik"
version="1.0.0"
script="GodotVolumeRenderingPlugin.cs"
You will also need a EditorPlugin, that you reference to in your plugin.cfg (see “script=“GodotVolumeRenderingPlugin.cs”):
#if TOOLS // Only use this script when in editor or editor player (excluded form builds)
using Godot;

[Tool]
public partial class GodotVolumeRenderingPlugin : EditorPlugin
{
	private VolumeContainerNodeInspector volumeContainerNodeInspector;

	public override void _EnterTree()
	{
        // Initialise
	}

	public override void _ExitTree()
	{
        // CLeanup
	}
}
#endif
This script is where we will initialise our custom nodes and inspectors (will come back to this later).
Exclude code from compilation when not in editor (Unity: #if UNITY_EDITOR)
In Unity, you can use a #if UNITY_EDITOR check to exlude code from being compiled and used in game builds.
In Godot you can use #if TOOLS for this.
See a full list of available defines here.
Making a custom Node (Unity: GameObject/Component)
Godot’s answer to Unity’s GameObject/Conponent system is Node. You can creeate your own Node types, inheriting from various base classes, and compose them in a tree. Here is a great tutorial on that if you’re new to Godot, coming from Unity.
TLDR: Instead of attaching Components to GameObjects, you create your own Node types and add them as children to some spatial node.
Creating your own Node type in C# is quite simple.
First, create your node class. Example:
using Godot;

public partial class VolumeContainerNode : Node
{
	public override void _Ready() // Unity: Start()
    {
        // Called every time the node is added to the scene.
    }

    public override void _Process(double delta) // Unity: Update()
    {
        // Called every frame.
    }
}
Note: _Ready() is similar to Unity’s Start(), and _Process() is similar to Update().
Second, you need to update your EditorPlugin and call AddCustomType to add your new Node to Godot:
#if TOOLS
using Godot;
using System;

[Tool]
public partial class GodotVolumeRenderingPlugin : EditorPlugin
{
	private VolumeContainerNodeInspector volumeContainerNodeInspector;

	public override void _EnterTree()
	{
		var script = GD.Load<Script>("res://addons/godot_volume_rendering/source/VolumeContainerNode.cs");
        var texture = GD.Load<Texture>("icon.png"); // can be null
        AddCustomType("VolumeContainerNode", "Node", script, texture);
	}
}
#endif
Getting _Ready() and _Process() to run in editor (Unity: ExecuteInEditMode)
In Unity you can use the ExecuteInEditMode attribute to make instances of your script run in the editor, so that the Start() and Update() methods be executed while in editor as well.
In Godot you can do this as well, by adding the Tool attribute.
Example:
using Godot;

[Tool]
public partial class VolumeContainerNode : Node
{
    public override void _Process(double delta) // Unity: Update()
    {
        if (Engine.IsEditorHint())
        {
            GD.Print("_Process() called from editor");
        }
    }
}
While in Unity you’d use Application.isPlaying to check if you are in play mode, in Godot you can use Engine.IsEditorHint() to check if you are in editor (not in play mode).
For more info, see the official documentation.
Creating a custom inspector plugin (Unity: Custom Editor)
In Unity you can create your own custom Editor script to customise how a Component is shown in th einspector.
In Godot you can create a EditorInspectorPlugin to do this.
Example:
#if TOOLS
using Godot;

public partial class VolumeContainerNodeInspector : EditorInspectorPlugin
{
    public override bool _CanHandle(GodotObject @object)
    {
        return @object.GetType() == typeof(VolumeContainerNode);
    }

    public override void _ParseEnd(GodotObject @object)
    {
        Button btnImport = new Button();
        btnImport.Text = "Import dataset";
        btnImport.Pressed += () => {
            // Do something
        };
        AddCustomControl(btnImport);
    }
}
#endif
Here we create a custom inspector for VolumeContainerNode, that adds a button with the text “Import dataset”.
Some details:
- To make this inspector show for our specified
Nodetype, we overridepublic bool _CanHandle(GodotObject @object), and theck the type of the passed object. This is similar to doing[CustomEditor(typeof(VolumeContainerNode))]in Unity, except it’s slightly more powerful and customisable. - In the
_ParseEndmethod you can callAddCustomControl(control)to add aControl(Godot’s UI element).
You can read more about Godot’s UI system here.
Since you use the same UI system for Editor scripting, this means that it’s easy to re-use UI code between Editor UI and Game UI!
You will also need to tell Godot about your custom editor, so we’ll update our EditorPlugin script and add a call to AddInspectorPlugin() and RemoveInspectorPlugin();:
#if TOOLS
using Godot;

[Tool]
public partial class GodotVolumeRenderingPlugin : EditorPlugin
{
	private VolumeContainerNodeInspector volumeContainerNodeInspector;

	public override void _EnterTree()
	{
        var script = GD.Load<Script>("res://addons/godot_volume_rendering/source/VolumeContainerNode.cs");
        var texture = GD.Load<Texture>("icon.png");
        AddCustomType("VolumeContainerNode", "Node", script, texture);
		volumeContainerNodeInspector = new VolumeContainerNodeInspector();
		AddInspectorPlugin(volumeContainerNodeInspector);
	}

	public override void _ExitTree()
	{
		RemoveInspectorPlugin(volumeContainerNodeInspector);
	}
}
#endif
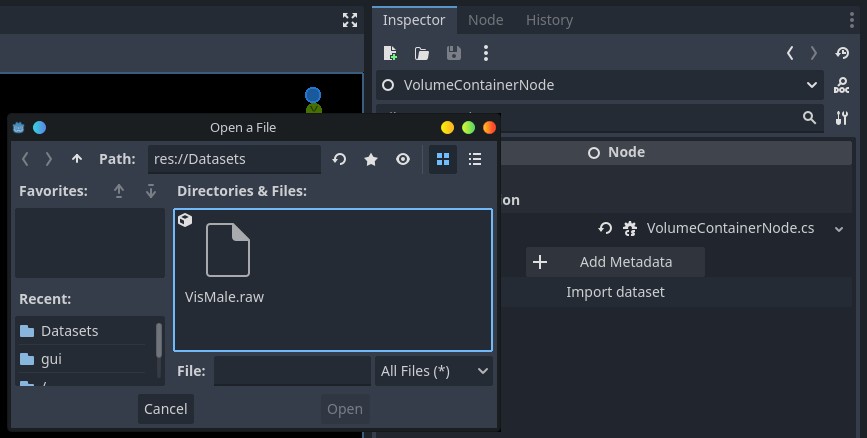
Creating a file dialog (Unity: EditorUtility.OpenFilePanel)
In Unity, you can call EditorUtility.OpenFilePanel to show a file dialog. This is only available in the editor, and there’s no alternative for game builds… That’s not the case in Godot!
In Godot you can use the FileDialog or EditorFileDialog.
FileDialog works in game builds as well, while EditorFileDialog is only available in the editor. It adds some extra functionality, such as favourites/recent files and thumbnails.
Example (updated custom inspector):
#if TOOLS
using Godot;

public partial class VolumeContainerNodeInspector : EditorInspectorPlugin
{
    public override bool _CanHandle(GodotObject @object)
    {
        return @object.GetType() == typeof(VolumeContainerNode);
    }

    public override void _ParseEnd(GodotObject @object)
    {
        Button btnImport = new Button();
        btnImport.Text = "Import dataset";
        btnImport.Pressed += () => {
            VolumeContainerNode volumeContainerNode = @object as VolumeContainerNode;

            EditorFileDialog fileDialog = new EditorFileDialog();
            fileDialog.FileMode = EditorFileDialog.FileModeEnum.OpenFile;
            fileDialog.CurrentDir = "res://Datasets";
            EditorInterface.Singleton.GetEditorViewport3D().AddChild(fileDialog);
            fileDialog.FileSelected += (string filePath) => {
                GD.Print("User selected: " + filePath);
            };
            fileDialog.Popup();
        };
        AddCustomControl(btnImport);
    }
}
#endif
Designing your editor UI
Godot has a UI designer, and you can of course use that to design your own Editor UI!
First, create a new scene, and design your UI as you normally would. If you’re new to GUI design in Godot, please read the official documentation. TLDR: For testing you can just create a new scene, and add a Button node to it, and set the text to something.
Then save your scene (example: “RawDatasetImporterDialog.tscn”).
We now have a UI scene that we can load from code:
- Call GD.Load
(YOUR_PATH).Instantiate() to load and instantiate it. - Call
AddChild()to add you control to another one.
By the way, if you find this confusing: A scene in Godot is quite different form a scene in Unity. In Godot a scene is basically a Node (or UI Control), and all its hierarchy. So when we load a UI scene, we are actually just loading the root Control (a Button, or whatever..).
contentControl = GD.Load<PackedScene>("res://addons/godot_volume_rendering/gui/RawDatasetImporterDialog.tscn").Instantiate<RawDatasetImporterControl>();
AddChild(contentControl);
See example from my project here.
Sharing is caring!