Comments
You can use your Mastodon account to reply to this post.
I’ve always been fascinated by old-fasioned pseudo-3D (a.k.a. 2.5D). It just looks really nice to me, and I think it’s fun to work with as well. It can be implemented by using high-school level trigonometry, and there are countless ways of doing the calculations - only your creativity and knowledge of trigonometry can stop you. In this blog post I’ll try to explain how I implemented pseudo-3D rendering in C++. I used SFML to create the window and draw the pixels, but you can use any library you want.
I’ve uploaded the full source code to a repository here: https://codeberg.org/matiaslavik/pseudo-3d-tutorial/src/branch/main/src/tutorial_part1
The repository contains 4 parts. This blog post covers part 1. To test it, replace Tutorial4 with Tutorial1 in main.cpp.
The map is stored in a flattened 2D array, where each cell contains a value indicating whether it’s empty or not.
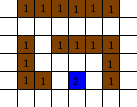
This is how we set up the map in code:
const unsigned char map[MAP_SIZE*MAP_SIZE] = {
    0, 0, 0, 0, 0, 0, 0, 3,
    0, 0, 2, 0, 0, 0, 0, 1,
    0, 0, 2, 0, 0, 0, 0, 3,
    1, 0, 0, 0, 1, 0, 0, 3,
    1, 0, 0, 0, 0, 0, 0, 1,
    2, 0, 3, 0, 0, 1, 0, 1,
    2, 0, 0, 0, 0, 1, 0, 1,
    1, 1, 2, 2, 2, 1, 1, 1
};
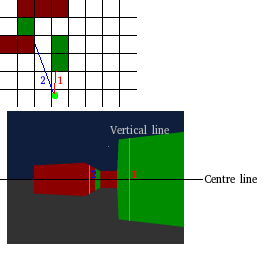
Imagine that we place the screen in front of us, and cast rays through each pixel (from our eye) and assign a colour to that pixel based on what the ray hits.
This is basically how raycasting works. However, we’d need to cast a lot of rays, which is expensive. To make it simpler we can “cheat” a little bit, and only cast rays through a horizontal line of pixels in the centre of the screen. When we hit something we calculate how tall it should look on the screen (based on distance) and draw a vertical line.
When rendering, we treat the player camera as a 2D line of pixels, and cast rays through each “pixel”. We raycast on a 2D grid (the map above), which is actually really simple, since the distance between each intersection on the grid’s X and Y axis lines is constant.
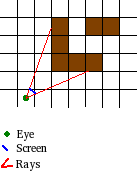
When we hit a wall, we calculate how tall it should look on the screen, based on the distance and then draw a vertical line on the screen.
The camera can be defined by:
The field of view is a measure of how wide you can see. When raycasting it will be the angle between the first (leftmost) and the last (rightmost) ray.
Our near plane is the screen, which we can position at any distance we want from the eye. However, we won’t see what’s behind it, so we want to keep the distance relatively small. I’ve used a value of 0.05 in this example.
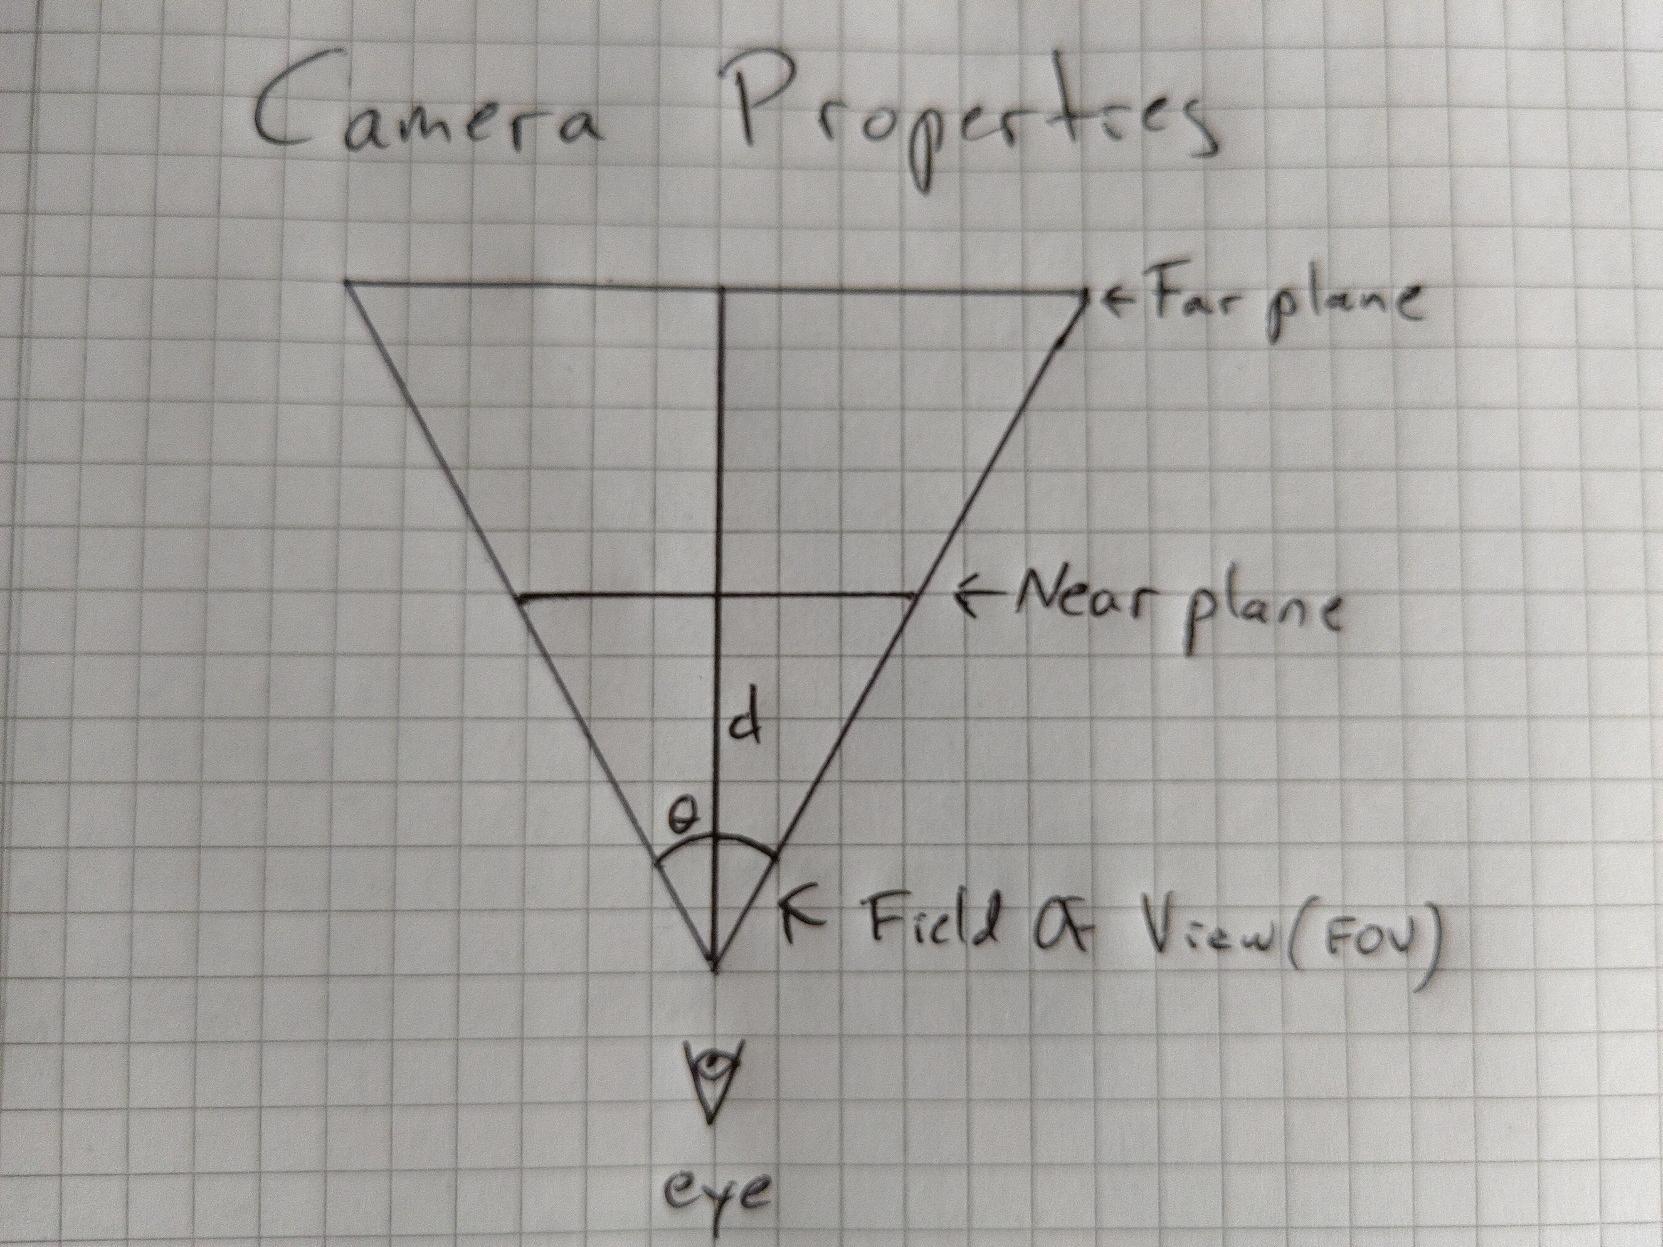
When raycasting form each pixel, we need some way to find the world space position of the pixel. There are several ways to do this, but I did it by calculating the width of the camera. We already know the FOV and the near plane distance, so if we create a right angled triangle, we can use the “law of sines” to calculate the half width. We can then use this to calculate the pixel position.
 Camera view plane calculation: Find the width and world space centre of the view plane.
B___a___ _ _   <- view plane (a = half width)
 \    |    /
  \   |   /
   \ b|  /  b = near (camera near plane distance)
    \ | /
     \|/
     A      A = FOV (Field Of View) / 2
 Law of sines: a / sin(A) = b / sin(B)
               => a = sin(A) * b / sin(B)
  We know B = 180 - 90 - half_fov, because a triangle always has a total of 180 degree angles, and the upper right angle is 90.
The variables are:
A, B and b are known, so we only need to find a, the length of the near plane.
Luckily we are dealing with a right angle, and to calculate an unknown distance/angle based on some known properties there are lots of trigonometric formulas we can use. I would recommend learning more about that if you haven’t already (or if you’ve forgotten). In our case, we can use the law of sines, which is an equation relating the lengths of the sides of any triangle to the sines of its angles.
$${a \over sin{A}} = {b \over sin{B}}$$
We can re-arrange this to:
$${a} = { b * sin{A} \over sin{B}}$$
We now have a way of calculating a, the length of the near plane. The distance between each vertical pixel will then simply be a divided by the screen width. We can use this to calculate the position of each pixel, which we need to construct the ray.
Code:
CameraProjection Game::CalculateCameraProjection(const Camera& camera)
{
    CameraProjection projection{};
    projection.camera = camera;
    projection.right = glm::vec2(camera.direction.y, -camera.direction.x);
    // Triangle adds up to 180 degrees => angle = 180 - 90 - half_fov
    const float bdivsinB =  camera.near / glm::sin(glm::radians(180.0f - 90.0f - camera.fov / 2.0f));
    // Law of sines: a / sin(A) = b / sin(B) => a = sin(A) * b / sin(B)
    const float halfWidth = bdivsinB * glm::sin(glm::radians(camera.fov));
    projection.width = halfWidth * 2.0f;
    projection.height = projection.width * (static_cast<float>(FRAMEBUFFER_HEIGHT) / FRAMEBUFFER_WIDTH);
    projection.centre = camera.position + camera.direction * camera.near;
    return projection;
}
And this is how we use it to set up the rays.
for (int iPixel = 0; iPixel < FRAMEBUFFER_WIDTH; iPixel++)
{
    const float tPixel = iPixel / (FRAMEBUFFER_WIDTH - 1.0f) - 0.5f;
    const glm::vec2 pixelPos = cameraProjection.centre + tPixel * cameraProjection.width * cameraProjection.right;
    const glm::vec2 rayDir = glm::normalize(pixelPos - camera.position);
    // ...
}
We now have a ray, and we want to find out what it hits. To do this, we will need to find intersections with each grid cell, and then check if the cell contains a wall.
Luckily, this can be done quite efficiently. The distance between each vertical grid line and each horizontal grid line is constant. If we can calculate these constants we can efficiently step through each grid cell by only adding a fixed offset.
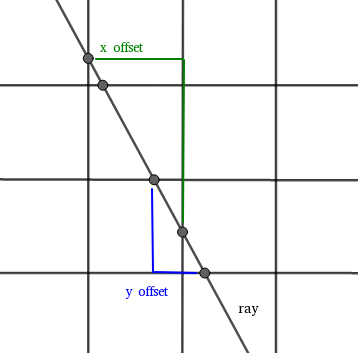
Explanation:
We can calculate the offsets like this:
const float xIntersectionOffset = 1.0f / std::max(std::abs(rayDir.x), 0.00001f);
const float yIntersectionOffset = 1.0f / std::max(std::abs(rayDir.y), 0.00001f);
Next, we calculate the distance to the next (first) vertical and horizontal intersections:
float nextXIntersection = std::numeric_limits<float>::max();
float nextYIntersection = std::numeric_limits<float>::max();
if (std::abs(rayDir.x) > 0.0001f)
{
    const float edgeX = rayDir.x > 0.0f ? std::floor(pixelPos.x + 1.0f) : std::floor(pixelPos.x);
    nextXIntersection = (edgeX - pixelPos.x) / rayDir.x;
}
if (std::abs(rayDir.y) > 0.0001f)
{
    const float edgeY = rayDir.y > 0.0f ? std::floor(pixelPos.y + 1.0f) : std::floor(pixelPos.y);
    nextYIntersection = (edgeY - pixelPos.y) / rayDir.y;
}
And then we loop through each, and stop when we hit a wall:
// Raytrace 2D grid
float t = 0.0f;
while(t < viewRange)
{
    // Pick nearest intersection
    if (nextXIntersection < nextYIntersection)
    {
        t = nextXIntersection;
        nextXIntersection += xIntersectionOffset;
    }
    else
    {
        t = nextYIntersection;
        nextYIntersection += yIntersectionOffset;
    }

    // Calculate current position
    const glm::vec2 rayPos = pixelPos + rayDir * (t * 1.001f);
    const int mapX = static_cast<int>(rayPos.x);
    const int mapY = static_cast<int>(rayPos.y);
    const int mapIndex = mapX + mapY * MAP_SIZE;
    // Look up current cell, and check if it is a wall.
    if (mapX >= 0 && mapY >= 0 && mapX < MAP_SIZE && mapY < MAP_SIZE && map[mapIndex] > 0)
    {
        // Get the wall colour
        const unsigned char mapValue = map[mapIndex];
        const sf::Color wallColour = wallColours[mapValue];
        // TODO: Draw wall, as vertical line
        break;
        }
    }
}
When we hit a wall, we calculate the depth (distance from the camera) and use that to decide how large the wall should look on the screen (projected height). We can then calculate n=screen_height / depth, and then draw n vertical pixels with the same colour at our current screen x position. This will give us a “fish eye” effect though.. to fix that we can multiply the depth by the cosine of the angle between our view direction and the current ray direction.
const float depth = glm::length(rayPos - pixelPos);
// Calculate projected wall height. Multiply distance by cos(angle) to avoid "fish eye" effect
const float wallHeightProj = camera.near / (depth * cosAngle);
// CAlculate screen space pixel height of wall.
const int wallHeightScreen = static_cast<int>((wallHeightProj / cameraProjection.height) * FRAMEBUFFER_HEIGHT);
// Draw wall as a 1 pixel wide line, with height relative to distance (depth)
DrawVertical(iPixel, wallHeightScreen, wallColour);
This is the whole function:
void Game::DrawWalls(const CameraProjection& cameraProjection)
{
    Camera camera = cameraProjection.camera;
    const float viewRange = camera.far - camera.near;
    for (int iPixel = 0; iPixel < FRAMEBUFFER_WIDTH; iPixel++)
    {
        const float tPixel = iPixel / (FRAMEBUFFER_WIDTH - 1.0f) - 0.5f;
        const glm::vec2 pixelPos = cameraProjection.centre + tPixel * cameraProjection.width * cameraProjection.right;
        const glm::vec2 rayDir = glm::normalize(pixelPos - camera.position);
        const float cosAngle = glm::dot(rayDir, camera.direction);

        // Calculate offset between ray intersections on grid X and Y lines
        const float xIntersectionOffset = 1.0f / std::max(std::abs(rayDir.x), 0.00001f);
        const float yIntersectionOffset = 1.0f / std::max(std::abs(rayDir.y), 0.00001f);
        // Calculate next X and Y intersection
        float nextXIntersection = std::numeric_limits<float>::max();
        float nextYIntersection = std::numeric_limits<float>::max();
        if (std::abs(rayDir.x) > 0.0001f)
        {
            const float edgeX = rayDir.x > 0.0f ? std::floor(pixelPos.x + 1.0f) : std::floor(pixelPos.x);
            nextXIntersection = (edgeX - pixelPos.x) / rayDir.x;
        }
        if (std::abs(rayDir.y) > 0.0001f)
        {
            const float edgeY = rayDir.y > 0.0f ? std::floor(pixelPos.y + 1.0f) : std::floor(pixelPos.y);
            nextYIntersection = (edgeY - pixelPos.y) / rayDir.y;
        }

        // Raytrace 2D grid
        float t = 0.0f;
        while(t < viewRange)
        {
            // Pick nearest intersection
            if (nextXIntersection < nextYIntersection)
            {
                t = nextXIntersection;
                nextXIntersection += xIntersectionOffset;
            }
            else
            {
                t = nextYIntersection;
                nextYIntersection += yIntersectionOffset;
            }

            // Calculate current position
            const glm::vec2 rayPos = pixelPos + rayDir * (t * 1.001f);
            const int mapX = static_cast<int>(rayPos.x);
            const int mapY = static_cast<int>(rayPos.y);
            const int mapIndex = mapX + mapY * MAP_SIZE;
            // Look up current cell, and check if it is a wall.
            if (mapX >= 0 && mapY >= 0 && mapX < MAP_SIZE && mapY < MAP_SIZE && map[mapIndex] > 0)
            {
                // Get the wall colour
                const unsigned char mapValue = map[mapIndex];
                const sf::Color wallColour = wallColours[mapValue];
                const float depth = glm::length(rayPos - pixelPos);
                // Calculate projected wall height. Multiply distance by cos(angle) to avoid "fish eye" effect
                const float wallHeightProj = camera.near / (depth * cosAngle);
                // CAlculate screen space pixel height of wall.
                const int wallHeightScreen = static_cast<int>((wallHeightProj / cameraProjection.height) * FRAMEBUFFER_HEIGHT);
                // Draw wall as a 1 pixel wide line, with height relative to distance (depth)
                DrawVertical(iPixel, wallHeightScreen, wallColour);
                break;
            }
        }
    }
}
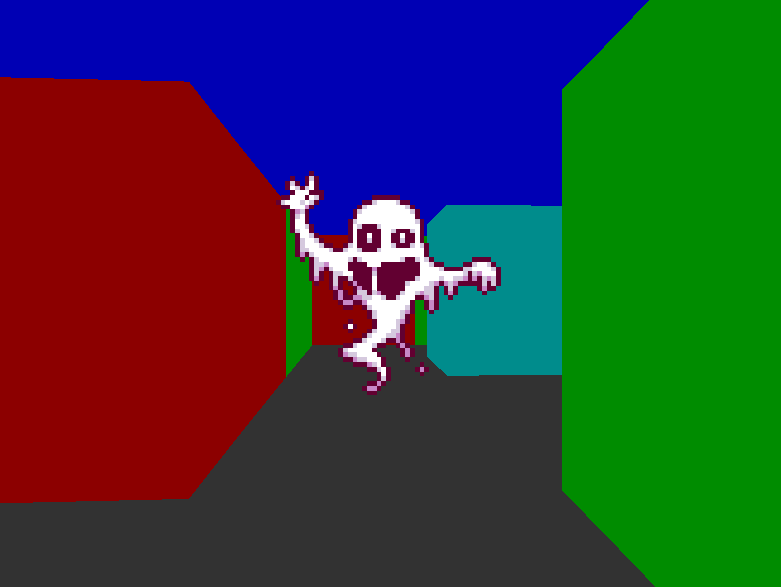
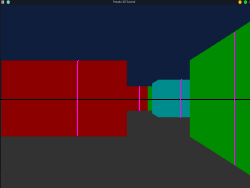
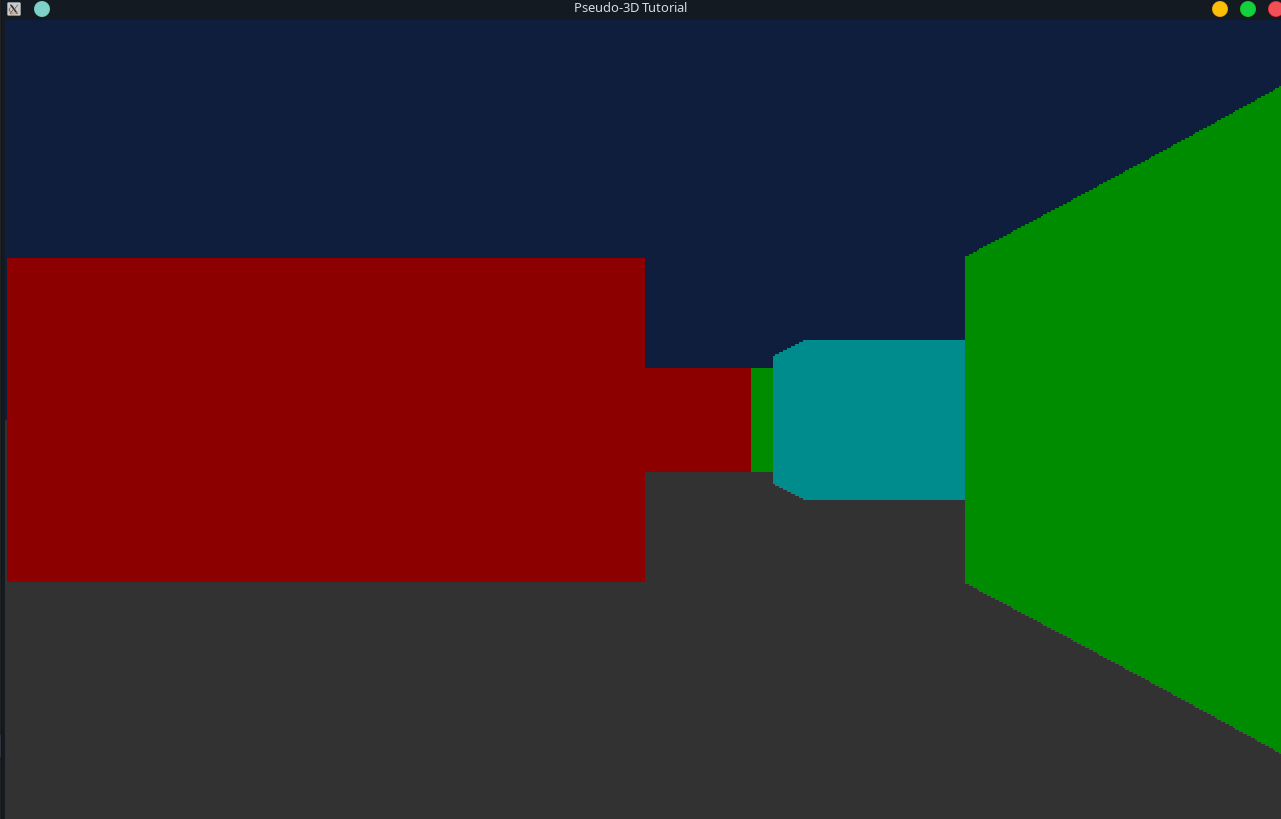
And this is how it looks:
Full source code can be found here.
Sharing is caring!