Comments
You can use your Mastodon account to reply to this post.

You can find the source code for this example here: https://codeberg.org/matiaslavik/SingleObjectPixelationHDRP
First, create a new project (through the Unity Hub). There is a HDRP template, however if you don’t want a fancy test scene and extra assets it might be simplest to set up HDRP from a standard 3D project. So let’s do that.
Next, we need to import the HDRP package. Click “Window” - “Package manager”, and find “High Definition RP” in the Unity Registry, and install it.
When it’s done installing, the HDRP wizard should appear automatically. There are a few things we need to set up before we can use the render pipeline. Luckily there is a magic button that does it all for us. Just click “Fix all”.
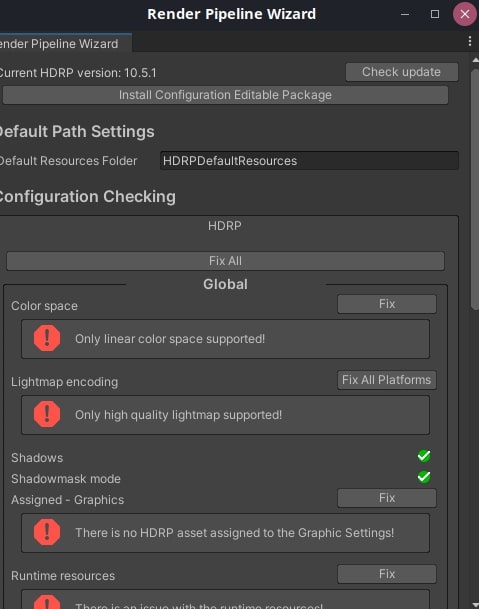
You will be asked if you want to create a HDRenderPipelineAsset. Click “Create One”. Unity will create a folder called “HDRPDefaultResources” with some assets inside for you.
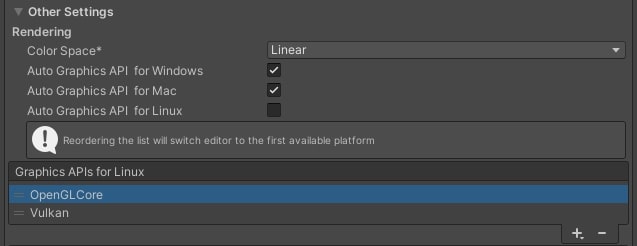
If you are on Linux, you might end up seeing a grey game window and an error message complaining about OpenGL not being supported by the HDRP. To fix this, open “Edit”->“Project settings”, go to “Player settings” and under “Other settings” uncheck the “Auto graphics API for Linux” checkbox, and remove “OpenGLCore” from the “Graphics APIs for Linux” list. You will be forced to restart the editor.
Congratulations, you are now using the High Definition Render Pipeline!
Let’s first create a folder for our scripts. I will call it “Scripts”.
Right click and click: “Create” -> “Rendering” -> “C# Custom Pass”. Then give a nice name to your new script file. I recommend “FancyPass.cs”.
The empty CustomPass class will look like this:
class FancyPass : CustomPass
{
    protected override void Setup(ScriptableRenderContext renderContext, CommandBuffer cmd)
    {
    }

    protected override void Execute(CustomPassContext ctx)
    {
    }

    protected override void Cleanup()
    {
    }
}
This is quite self-explanatory. The Setup function is used to initialise the pass. Here you will typically create the render targets and materials you need in your custom pass.
The Execute function is called once during rendering. When it’s called is decided by the CustomPassInjectionPoint of the CustomPassVolume. We will come back to this soon.
In the Cleanup function you should clean up your resources, such as any render targets or materials you created in the Setup function.
Since we’re going to modify the rendering pipeline with our custom pass, you should first add some geometry to the scene. I’ll just add some boxes and capsules to keep things simple. Just click “GameObject” in the top menu bar, go to “3D Object” and add something from there.
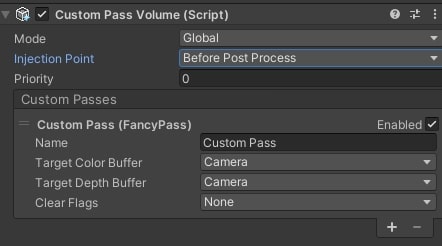
Now, let’s add the custom pass to our scene. Go back to the scene view and add a new GameObject, and add a CustomPassVolume component to it. Its list of custom passes will be empty. Click the “+” button and add your custom pass (FancyPass).
Next we need to decide when our custom pass should execute. You can set this by clicking the “Injection Point” drawer and selecting a point. We want to make a fullscreen post-processing effect, so let’s select “Before Post Process”. This ensures that any other post processing effects added to the scene (such as bloom) will execute after our pass, and be added on top of our effect.
Our pass is currently not doing anything, so adding it changed nothing.
Let’s first create our shader. Create a new folder called “Shaders”. Right click inside it and select “Create” -> “Shader” -> “HD Render Pipeline” -> “Post Process”. This will create a standard shader for us that takes a texture and outputs the colour. Note the first line in the shader. This is the name of the shader, and you will need that to reference it from our custom pass. You can change it to whatever you want. I will leave it as it is: Custom/FancyPass.
To keep things simple, let’s remove the texture from the shader and instead have it output a hard-coded red colour. Let’s remove these two lines:
TEXTURE2D_X(_InputTexture);float3 outColor = LOAD_TEXTURE2D_X(_InputTexture, positionSS).xyz;float4 CustomPostProcess(Varyings input) : SV_Target
{
UNITY_SETUP_STEREO_EYE_INDEX_POST_VERTEX(input);
float3 colour = float3(1.0, 0.0, 0.0);
return float4(colour, 1);
}
Now, go back to the custom pass source file (FancyPass.cs). We first need to find our shader. This can be done by calling Shader.Find("Custom/FancyPass") in the Setup function. This is the shader name defined in the first line of the shader. Next we call CoreUtils.CreateEngineMaterial and pass to it our shader, to create a material.
In the Execute function we will first need to set a render target that we want to render to. We can either create our own texture and render to it, or we can render directly to the camera’s colour buffer. To do that, we call CoreUtils.SetRenderTarget(ctx.cmd, ctx.cameraColorBuffer, ClearFlag.None);. Next we want to do a full screen draw call with our new material. We do this by calling CoreUtils.DrawFullScreen(ctx.cmd, fullscreenMaterial, ctx.propertyBlock, shaderPassId: 0);.
Oh and let’s not forget to destroy our material in the Cleanup function.
This is our new custom pass:
class FancyPass : CustomPass
{
    private Shader fullscreenShader;
    private Material fullscreenMaterial;

    protected override void Setup(ScriptableRenderContext renderContext, CommandBuffer cmd)
    {
        fullscreenShader = Shader.Find("Custom/FancyPass");
        fullscreenMaterial = CoreUtils.CreateEngineMaterial(fullscreenShader);

        Debug.Assert(fullscreenMaterial != null, "Failed to create fullscreen pass material");
    }

    protected override void Execute(CustomPassContext ctx)
    {
        CoreUtils.SetRenderTarget(ctx.cmd, ctx.cameraColorBuffer, ClearFlag.None);
        CoreUtils.DrawFullScreen(ctx.cmd, fullscreenMaterial, ctx.propertyBlock, shaderPassId: 0);
    }

    protected override void Cleanup()
    {
        CoreUtils.Destroy(fullscreenMaterial);
    }
}
Go back to Unity, and you will find that your game view is now all red, thanks to our amazing shader.
What if we want to modify the existing colour buffer of the camera, instead of simply overwriting it? You could do this by adding a texture to the shader and passing it from our custom pass like this: ctx.propertyBlock.SetTexture("_CameraColourTexture", ctx.cameraColorBuffer);
However, the texture is already there and we can read it using the built-in LoadCameraColor shader function, so we don’t need to do that!
Let’s create a shader that reads the camera colour and mixes it with red:
float4 CustomPostProcess(Varyings input) : SV_Target
{
    UNITY_SETUP_STEREO_EYE_INDEX_POST_VERTEX(input);

    float3 colour = LoadCameraColor(input.positionCS.xy, 0);
    colour = (colour + float3(1.0, 0.0, 0.0)) / 2;

    return float4(colour, 1);
}
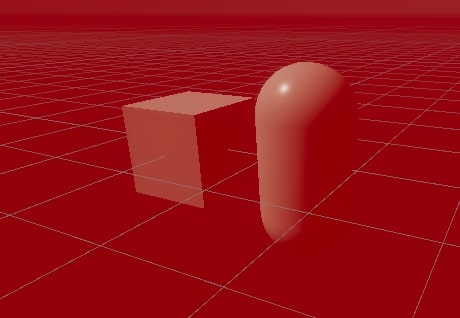
Your game view should now look like this:
Let’s do something slightly more interesting. We will create a screen space pixelation effect that is only applied to certain objects.
We will do the following:
First, open the scene view and select a GameObject. In the upper right corner of the inspector click “Layer” and add a new layer called “Pixelate” and assign it to this GameObject.

We need to create a new shader for our custom pass. It will be a simple shader that just outputs a red colour. The shader is a bit too long to copy-paste here, so here is a link.
Note that we set ZWrite Off and ZTest LEqual. We want to do depth testing to make sure our object is not rendered to the RT if it’s behind another object, but we don’t want to write to the depth buffer at this stage (remember, this is done during post processing!).
In our custom pass we will create a LayerMask and set it to LayerMask.GetMask("Pixelate").
We will also create a new RTHandle (render target) like this:
intermediateRenderTarget = RTHandles.Alloc(
    Vector2.one, TextureXR.slices, dimension: TextureXR.dimension,
    colorFormat: GraphicsFormat.B10G11R11_UFloatPack32,
    useDynamicScale: true, name: "Immediate Test Buffer"
);
In the Execute function we will simply call CoreUtils.SetRenderTarget to use our immediate render target, and render all the objects with the “Pixelate layer” by passing our layer to the CustomPassUtils.DrawRenderers function.
This is our new custom pass:
class FancyPass : CustomPass
{
    private Shader fullscreenShader;
    private Material fullscreenMaterial;
    private Shader prePassShader;
    private Material prePassMaterial;
    private RTHandle intermediateRenderTarget;
    private LayerMask pixelationLayer = ~0;

    protected override void Setup(ScriptableRenderContext renderContext, CommandBuffer cmd)
    {
        // Create pre pass shader/material
        prePassShader = Shader.Find("Custom/PrePass");
        prePassMaterial = CoreUtils.CreateEngineMaterial(prePassShader);
        Debug.Assert(fullscreenMaterial != null, "Failed to create fullscreen pass material");

        // Create fullscree shader/material
        fullscreenShader = Shader.Find("Custom/FancyPass");
        fullscreenMaterial = CoreUtils.CreateEngineMaterial(fullscreenShader);
        Debug.Assert(fullscreenMaterial != null, "Failed to create fullscreen pass material");
        fullscreenMaterial.SetColor(0, Color.red);

        pixelationLayer = LayerMask.GetMask("Pixelate");

        // Create render target for pre-pass
        intermediateRenderTarget = RTHandles.Alloc(
            Vector2.one, TextureXR.slices, dimension: TextureXR.dimension,
            colorFormat: GraphicsFormat.B10G11R11_UFloatPack32,
            useDynamicScale: true, name: "Immediate Test Buffer"
        );
    }

    protected override void Execute(CustomPassContext ctx)
    {
        // Pre pass
        CoreUtils.SetRenderTarget(ctx.cmd, intermediateRenderTarget, ClearFlag.Color);
        CustomPassUtils.DrawRenderers(ctx, pixelationLayer, RenderQueueType.All, prePassMaterial);

        // Fullscreen pass
        ctx.propertyBlock.SetTexture("_InputTexture", intermediateRenderTarget);
        CoreUtils.SetRenderTarget(ctx.cmd, ctx.cameraColorBuffer, ClearFlag.None);
        CoreUtils.DrawFullScreen(ctx.cmd, fullscreenMaterial, ctx.propertyBlock, shaderPassId: 0);
    }

    protected override void Cleanup()
    {
        CoreUtils.Destroy(prePassMaterial);
        CoreUtils.Destroy(fullscreenMaterial);
        intermediateRenderTarget.Release();
    }
}
Finally, let’s create the pixelation effect in our fullscreen shader.
TEXTURE2D_X(_InputTexture);

    float4 CustomPostProcess(Varyings input) : SV_Target
    {
        UNITY_SETUP_STEREO_EYE_INDEX_POST_VERTEX(input);

        // Look up current pixel/fragment in immediate texture
        uint2 positionSS = input.texcoord * _ScreenSize.xy;
        float3 immediateColor = LOAD_TEXTURE2D_X(_InputTexture, positionSS).xyz;
        float pixelation = immediateColor.r; // How much to pixelate

        // Create pixelaed UV coordinates
        float pixu = floor(input.positionCS.x) - (input.positionCS.x % 5.0);
        float pixv = floor(input.positionCS.y) - (input.positionCS.y % 5.0);
        float2 uvpix = float2(pixu, pixv);

        // Lerp between normal UV and pixelated UV based on pixelation factor
        float2 uv = lerp(input.positionCS.xy, uvpix, pixelation);
        float3 colour = LoadCameraColor(uv, 0);

        return float4(colour, 1);
    }
This is our result:

Notice how the object with “Pixelation” layer is pixelated, while the other is not.
We could also do other effects this way, such as blur.
Source code here.
Sharing is caring!