Cross platform native plugins in Unity
Cross platform native plugins in Unity
When developing games and software in Unity you sometimes need to use native C++ plugins. Maybe you needed to write some of your code in C++, or there is a C++ library that you want to use in Unity.
Unity’s documentation explains briefly how this can be done, but when it comes to cross platform plugins (for Windows, Linux, Android, etc.) I found the documentation a bit lacking. In this post, I will go more into details, and show an example where I create a plugin in C++, build it for Linux, Windows and Android, and use it through Unity.
NOTE: I have created a git repository for this tutorial here: https://codeberg.org/matiaslavik/UnityNativePlugin (simply use that if you’re in a hurry)
Shared libraries
The first thing you need to know, is what a shared/dynamic library is.
If you want to write some code in language A and use it in a software made with language B, then you need to compile the code into a library and then use that library from language B. The library file will contain the compiled code (similar to an executable), but is meant to be used as a library rather than being executed directly. There are two types of libraries: shared libraries and static libraries.
If you’re a Windows user then you’re probably already familiar with shared libraries. On Windows these are called DLLs (Dynamic Link Library, Microsoft’s implementation of the shared library concept). These are libraries that can be loaded at runtime, while static libraries are resolved at compile time. On Windows, shared (dynamic) libraries are stored in “.dll” files, while on Linux and Android they have the “.so” file extension.
When making plugins for Unity, we want to use shared (dynamic) libraries. In other words: We first write the code (in C++), then build it for a specific architecture (Linux, Windows, Android) to a shared library (.dll / .so) and then finally load it from Unity.
Plugin source code
First, create a C++ header file called native_plugin.h:
#if defined(_MSC_VER)
    #ifdef NativePlugin_EXPORTS
    /* We are building this library */
        #define NATIVEPLUGIN_API extern "C" __declspec(dllexport)
    #else
    /* We are using this library */
        #define NATIVEPLUGIN_API extern "C" __declspec(dllimport)
    #endif
#else
    #define NATIVEPLUGIN_API extern "C"
#endif

NATIVEPLUGIN_API int get_number();

NATIVEPLUGIN_API bool is_windows();
First, we define our NativePlugin_EXPORTS preprocessor definition, which does the following:
- Adds
extern “C”to the beginning of the function definition. This tells the compiler to use C linkage for the function. In C++ you can have several (overloaded) functions with the same name. However, when exporting to a shared library these functions need to have an unique name, and how this name is generated (=name mangling) depends on the compiler. Since we are going to use our library from another language (and compiler), we need to be able to find these function by name only. The solution then is to use C linkage, since C does not allow name mangling. In other words, you can only have one function called “get_number”, which in return allows us to use this function from C#/Unity. - On Windows: Adds
__declspec(dllexport)or__declspec(dllimport)to the function definition. This tells the compiler whether we’re exporting the function to a library or importing it. dllimport is only useful when using the library from C++, so we could have ignored it in this example, but I think it’s better practice to not make any assumptions about how the library will be used.
We then define two functions:
get_number: returns a number (42)is_windows: returns true if we are running on Windows, and false if not.
Then, let’s create a C++ source file called “native_plugin.cpp”:
#include "native_plugin.h"

NATIVEPLUGIN_API int get_number()
{
    return 42;
}

NATIVEPLUGIN_API bool is_windows()
{
#ifdef _WIN32
    return true;
#else
    return false;
#endif
}
The get_number function is simple and always returns the value of 42.
The is_windows function will return true only if we are running on Windows. To do this, we use the preprocessor definition _WIN32 (which is only defined when compiling for Windows) to add platform-dependent code.
Build setup (CMake)
Next, we need to create a cross platform way of building our plugin. We could of course create a Visual Studio project for Windows builds, and makefiles for each other platform, but this is very cumbersome and there is a more standard way of doing this: Using CMake.
CMake is a free and open source tool for build automation, and allows you to make scripts for building C++ code on various platforms. To use it, you just need to download CMake from their website, or through terminal/APT on Linux, and then create a CMakeLists.txt in your project directory.
cmake_minimum_required(VERSION 3.3)
project(NativePlugin)

# set source code directory
set(SourceDir src)

# find all source files
file(GLOB_RECURSE SRC_FILES
    ${SourceDir}/*.cpp
    ${SourceDir}/*.h
)

include_directories (${SourceDir})

# create a shared library (.dll/.so)
add_library(NativePlugin SHARED ${SRC_FILES})
If you’re not familiar with CMake, I would definitely recommend learning the basics. However, for a basic C++ plugin (without any extra dependencies) then the above CMakeLists.txt should be sufficient for all cases.
Building the plugin (Windows)
Dependencies: CMake and Visual Studio.
- Open CMake GUI
- Set source code directory (“Where is the source code: ” in CMake GUI) to the repository root directory
- Configure and Generate (make sure you select x64)
- Click “Open project”
- Build the projject in Visual Studio (x64 – Release)
This will create a shared/dynamic library file: NativePlugin.dll
Dependencies: CMake and Visual Studio(or other compiler).
- Open CMake GUI
- Set source code directory (“Where is the source code: ” in CMake GUI) to the repository root directory
- Configure and Generate (make sure you select x64)
- Click “Open project”
- Build the projject in Visual Studio (x64 – Release)

This will create a shared/dynamic library file: NativePlugin.dll
Building the plugin (Linux)
Dependencies: CMake and a C++ compiler (g++). You can install these from the terminal with APT: sudo apt install cmake g++ make.
To build you have several options:
Build from terminal:
- Open terminal
cmake .make NativePlugin
Build from Qt Creator:
- Download Qt Creator. Note: If you’re on Ubuntu, you can simply install it from the “Software” installer.
- In Qt Creator: File -> Open file or project -> select CMakeLists.txt
- Click “configure project”
- Build project (you might want to change from Debug to Release as well)
This will create a shared library file: “libNativePlugin.so”.
Building for Android
First you need to install Unity (I’m using 2020.2) with Android build support. This will install NDK for you.
Then (on Linux), make the following file (make_android.sh):
ANDROID_NDK_PATH="/home/matias/Unity/Hub/Editor/2020.2.1f1/Editor/Data/PlaybackEngines/AndroidPlayer/NDK"
cmake . \
    -G"Unix Makefiles" \
    -DCMAKE_BUILD_TYPE=Release \
    -DCMAKE_TOOLCHAIN_FILE="${ANDROID_NDK_PATH}/build/cmake/android.toolchain.cmake" \
    -DCMAKE_MAKE_PROGRAM="${ANDROID_NDK_PATH}/prebuilt/linux-x86_64/bin/make" \
    -DANDROID_NDK="${ANDROID_NDK_PATH}" \
    -DANDROID_NATIVE_API_LEVEL=android-9 \
    -DANDROID_ABI=arm64-v8a

cmake --build .
In the shell file you just created, modify the path in “ANDROID_NDK_PATH” to the corresponding path for your Unity installation.
Then open the terminal and run the shell script: ./make_android.sh
On Windows, use this batch file:
@echo off

set CMAKE_PATH="D:\Program Files\CMake\bin\cmake.exe"
set ANDROID_NDK_PATH=D:\UnityAndroidNDK\NDK

rmdir /s /q build
mkdir build
cd build

%CMAKE_PATH% .. ^
    -G"MinGW Makefiles" ^
   -DCMAKE_BUILD_TYPE=Release ^
   -DCMAKE_TOOLCHAIN_FILE=%ANDROID_NDK_PATH%\build\cmake\android.toolchain.cmake ^
   -DCMAKE_MAKE_PROGRAM=%ANDROID_NDK_PATH%\prebuilt\windows-x86_64\bin\make.exe ^
   -DANDROID_NDK=%ANDROID_NDK_PATH% ^
   -DANDROID_NATIVE_API_LEVEL=android-9 ^
   -DANDROID_ABI=armeabi-v7a

%CMAKE_PATH% --build .

popd
Here you need to modify CMAKE_PATH to your CMake installation path, as well as ANDROID_NDK_PATH. Then run the batch file (double click).
Using the plugin in Unity
First, go to Assets/Plugins and create the following folder structure:
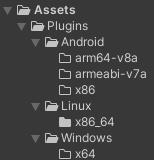
Put the library files (libNativePlugin.so / NativePlugin.dll) into the corrersponding folders.
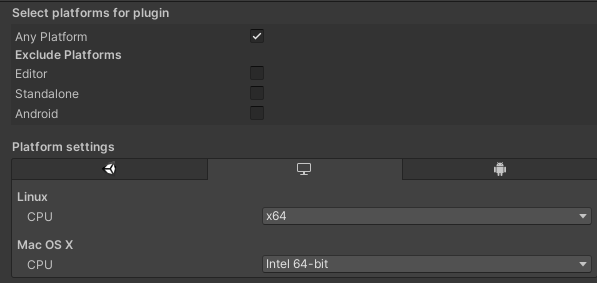
Then we need to tell Unity which platform these library files are for. Select each of the library files in Unity, and make sure that the platform settings are correct. They should all be auto-detected, so you will probably not need to do anything. If you edit them, make sure that “Editor” and “Standalone” (or “Any platform”) is selected for Windows and Linux.

Next, let’s create an interface for the native plugin functions:
using System.Runtime.InteropServices;

/* C# interface for our native plugin. */
public class NativePluginInterface
{
    [DllImport("NativePlugin")]
    public static extern int get_number();

    [DllImport("NativePlugin")]
    public static extern bool is_windows();
}
As you can see, this contains the same functions as our C++ code, marked with extern and DLLImport. The parameter of the DLLImport attribute should be the library’s filename, minus “lib” and the file extension. So “libNativePlugin.so” and “NativePlugin.dll” become simply “NativePlugin”.
And finally, let’s create a test script that uses our functions:
using UnityEngine;

public class PluginTest : MonoBehaviour
{
    /* This static function will run when the game/application starts. */
    [RuntimeInitializeOnLoadMethod(RuntimeInitializeLoadType.BeforeSceneLoad)]
    private static void OnLoad()
    {
        Debug.Log($"get_number: {NativePluginInterface.get_number().ToString()}");
        Debug.Log($"is_windows: {NativePluginInterface.is_windows().ToString()}");
    }
}
Notice that the “OnLoad” functions uses the “RuntimeInitializeOnLoadMethod” attribute. This will make the function run when you start the application.
To test, simply hit the play button in the editor, or build for your desired platform.
Check the log (“console”). It should print “42” and “is_windows: false/true” (true only if you are on Windows).
Sharing is caring!