Unity HDRP: Pre-rendered backgrounds
Unity HDRP: Pre-rendered backgrounds
With today’s graphics hardware we rarely need to make very big sacrifices to achieve good looking graphics, but that was not always the case. Back in the days of Play Station 1 it could be difficult to render good-looking 3D backgrounds while still achieving an acceptable framerate. So many games (such as Final Fantasy VII - IX and Resident Evil 1 & 2) ended up doing a compromise: In return for limiting the game to have fixed camera angles (no camera movement), they were able to create beautifully detailed backgrounds. While this may seem like an unnecessary tradeoff with today’s hardware, it also allows you to mix 3D rendering with hand-drawn backgrounds. Today I will show an example of how this can be done in Unity’s HDRP.
Repository: https://codeberg.org/matiaslavik/PreRenderedBackgroundsHDRP
How it works
When doing 3D rendering (in a forward-rendered pipeline) you will typically write to two buffers:
- Colour bufer
- Depth buffer
The colour of each pixel is written to the colour buffer, and the depth (distance from the camera) is written to the depth buffer. When evaluating a pixel/fragment we use the depth buffer to determine if the current pixel should be visible or not (if it’s occluded). This is done for all opaque and transparent geometry (transparent material’s won’t write to the depth buffer though) every frame.
However, imagine a scene where you have a static background that does not move. As long as the camera does not move, we will end up writing the exact same values to the colour buffer and depth buffer when rendering the background. There might be other dynamic geometry that moves in the scene, but if we render the background first then at the point we finish rendering the background the content of the colour and depth buffer will be the same as it was at that point during the last frame. If the background geometry is very complex and expensive to render, we will waste a lot of time doing something we wouldn’t have to do if we had cached the results of a previous draw call instead. This is the idea behind pre-rendering. We draw the background once from a fixed camera, and save the colour and depth buffer. Then during gameplay we load the pre-rendered colour and depth buffer and use that, and only render the dynamic geometry (such as characters).
The implementation
I will assume that you are already familiar with Unity and the High Definition Rendering Pipeline. If you’re not, please read my other blog post about the HDRP first.
We will create two customm passes:
- PreRenderPass.cs: Pre-renders the background geometry.
- BlitPass.cs: Blits (copies) the pre-rendered textures to the camera’s colour buffer and depth buffer.
The pre-render pass
The blit pass executes after the opaque geometry, and has it’s injection point set to CustomPassInjectionPoint.BeforeTransparent.
We first create two custom render targets: One for the colour and one for the depth:
    depthRenderTarget = new RenderTexture(resWidth, resHeight, 24);
    colourRenderTarget = new RenderTexture(resWidth, resHeight, 24);
The blit pass uses the BlitToTexture shader which takes an input texture and copies it to the desired render target.
We use this shader twice: Once to copy the content of the cameraDepthBuffer over to a custom depth texture/target. And once to copy the content of the cameraColorBuffer over to a custom colour texture:
    // Pre-render scene depth.
    ctx.propertyBlock.SetTexture("_MainTexture", ctx.cameraDepthBuffer);
    CoreUtils.SetRenderTarget(ctx.cmd, depthRenderTarget, ClearFlag.Depth);
    CoreUtils.DrawFullScreen(ctx.cmd, material, ctx.propertyBlock, shaderPassId: 0);

    // Pre-render scene colour.
    ctx.propertyBlock.SetTexture("_MainTexture", ctx.cameraColorBuffer);
    CoreUtils.SetRenderTarget(ctx.cmd, colourRenderTarget, ClearFlag.Color);
    CoreUtils.DrawFullScreen(ctx.cmd, material, ctx.propertyBlock, shaderPassId: 0);
These textures are then saved to disk:
    RenderTexture.active = depthSaveRT;
    Texture2D depthTexture = new Texture2D(depthSaveRT.width, depthSaveRT.height, TextureFormat.RGB24, false);
    depthTexture.ReadPixels(new Rect(0, 0, depthSaveRT.width, depthSaveRT.height), 0, 0);
    RenderTexture.active = null;
    byte[] bytes = depthTexture.EncodeToPNG();
    System.IO.File.WriteAllBytes(depthTexturePath, bytes);
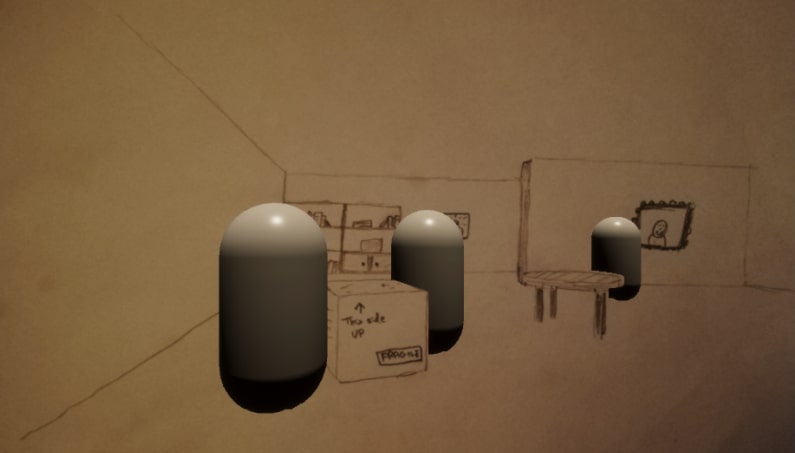
The pre-rendered textures can be imported as they are, or an artist can modify them to create more interesting backgrounds. You could, for example, replace the colour texture with a pretty hand drawn background (using the pre-rendered one as a template). This can allow you to create a background that looks like a paining, but still has a depth buffer that allows 3D characters to move inside of them.
The blit pass
The bli pass uses the BlitPreRendered shader to copy the contents of the pre-rendered colour and depth textures over to the camera’s colour and depth buffer. This is done before we render all the other geometry, so we set the injection point to be CustomPassInjectionPoint.BeforeRendering.
The shader takes two input textures:
- Depth texture
- Background texture
The content of these textures will simply be copied over to the colour render target and depth render target.
When the render pipeline starts rendering the other dynamic geometry, it will already have a colour and depth buffer with the background inside it.
This is the result:

Extra notes about implementation
When pre-rendering the background you want to disable all the dynamic geometry to make sure it’s not included in the pre-rendered textures. And at runtime (when using the pre-rendered textures) you want to disable the background geometry. To make this automatic, I put all static background geometry under one GameObject with a “PreRenderedGeometry” tag, and all the dynamic geometry under another GameObject tagged as “DynamicGeometry”. In the PreRenderingCamera script I find all objects with these tags and automatically enable/disable them.
Limitations and issues
An obvious limitation is that the camera cannot move. You can get around this by pre-rendering a much larger background than the in-game camera’s resolution, and moving the camera perpendicularly to it.
Another issue I noticed when doing pre-rendering this way in Unity is that any objects rendered after the BlitPass gets an extremely bright specular lighting (and an insane bloom, if that’s enabled). I’m not yet sure what causes this, but the issue can be hidden by disabling auto-exposure. I have added a Volume component to the pre-rendering camera object, that overrides the global Exposure setting by disabling it.
If you’re planning to make a large game in Unity with pre-rendered backgrounds, you might be better off creating a custom render pipeline for that. If what you’re aiming for is simple retro graphics, then it should not be that hard to use Unity’s scriptable render pipeline system to build your own.
Sharing is caring!